> ## Documentation Index
> Fetch the complete documentation index at: https://docs.blinko.space/llms.txt
> Use this file to discover all available pages before exploring further.
# Get Started
> Welcome to Blinko plugin development! This guide will help you set up your development environment and create your first plugin.
## Prerequisites
Before you begin, make sure you have the following installed:
* [Node.js](https://nodejs.org/) (v18 or higher)
* [Bun](https://bun.sh/) (latest version)
* [Git](https://git-scm.com/)
## Setting Up Your Development Environment
### 1. Create a New Plugin Project
You have three options to start your plugin project:
#### Option A: Use CodeSandbox (Recommended for Quick Start)
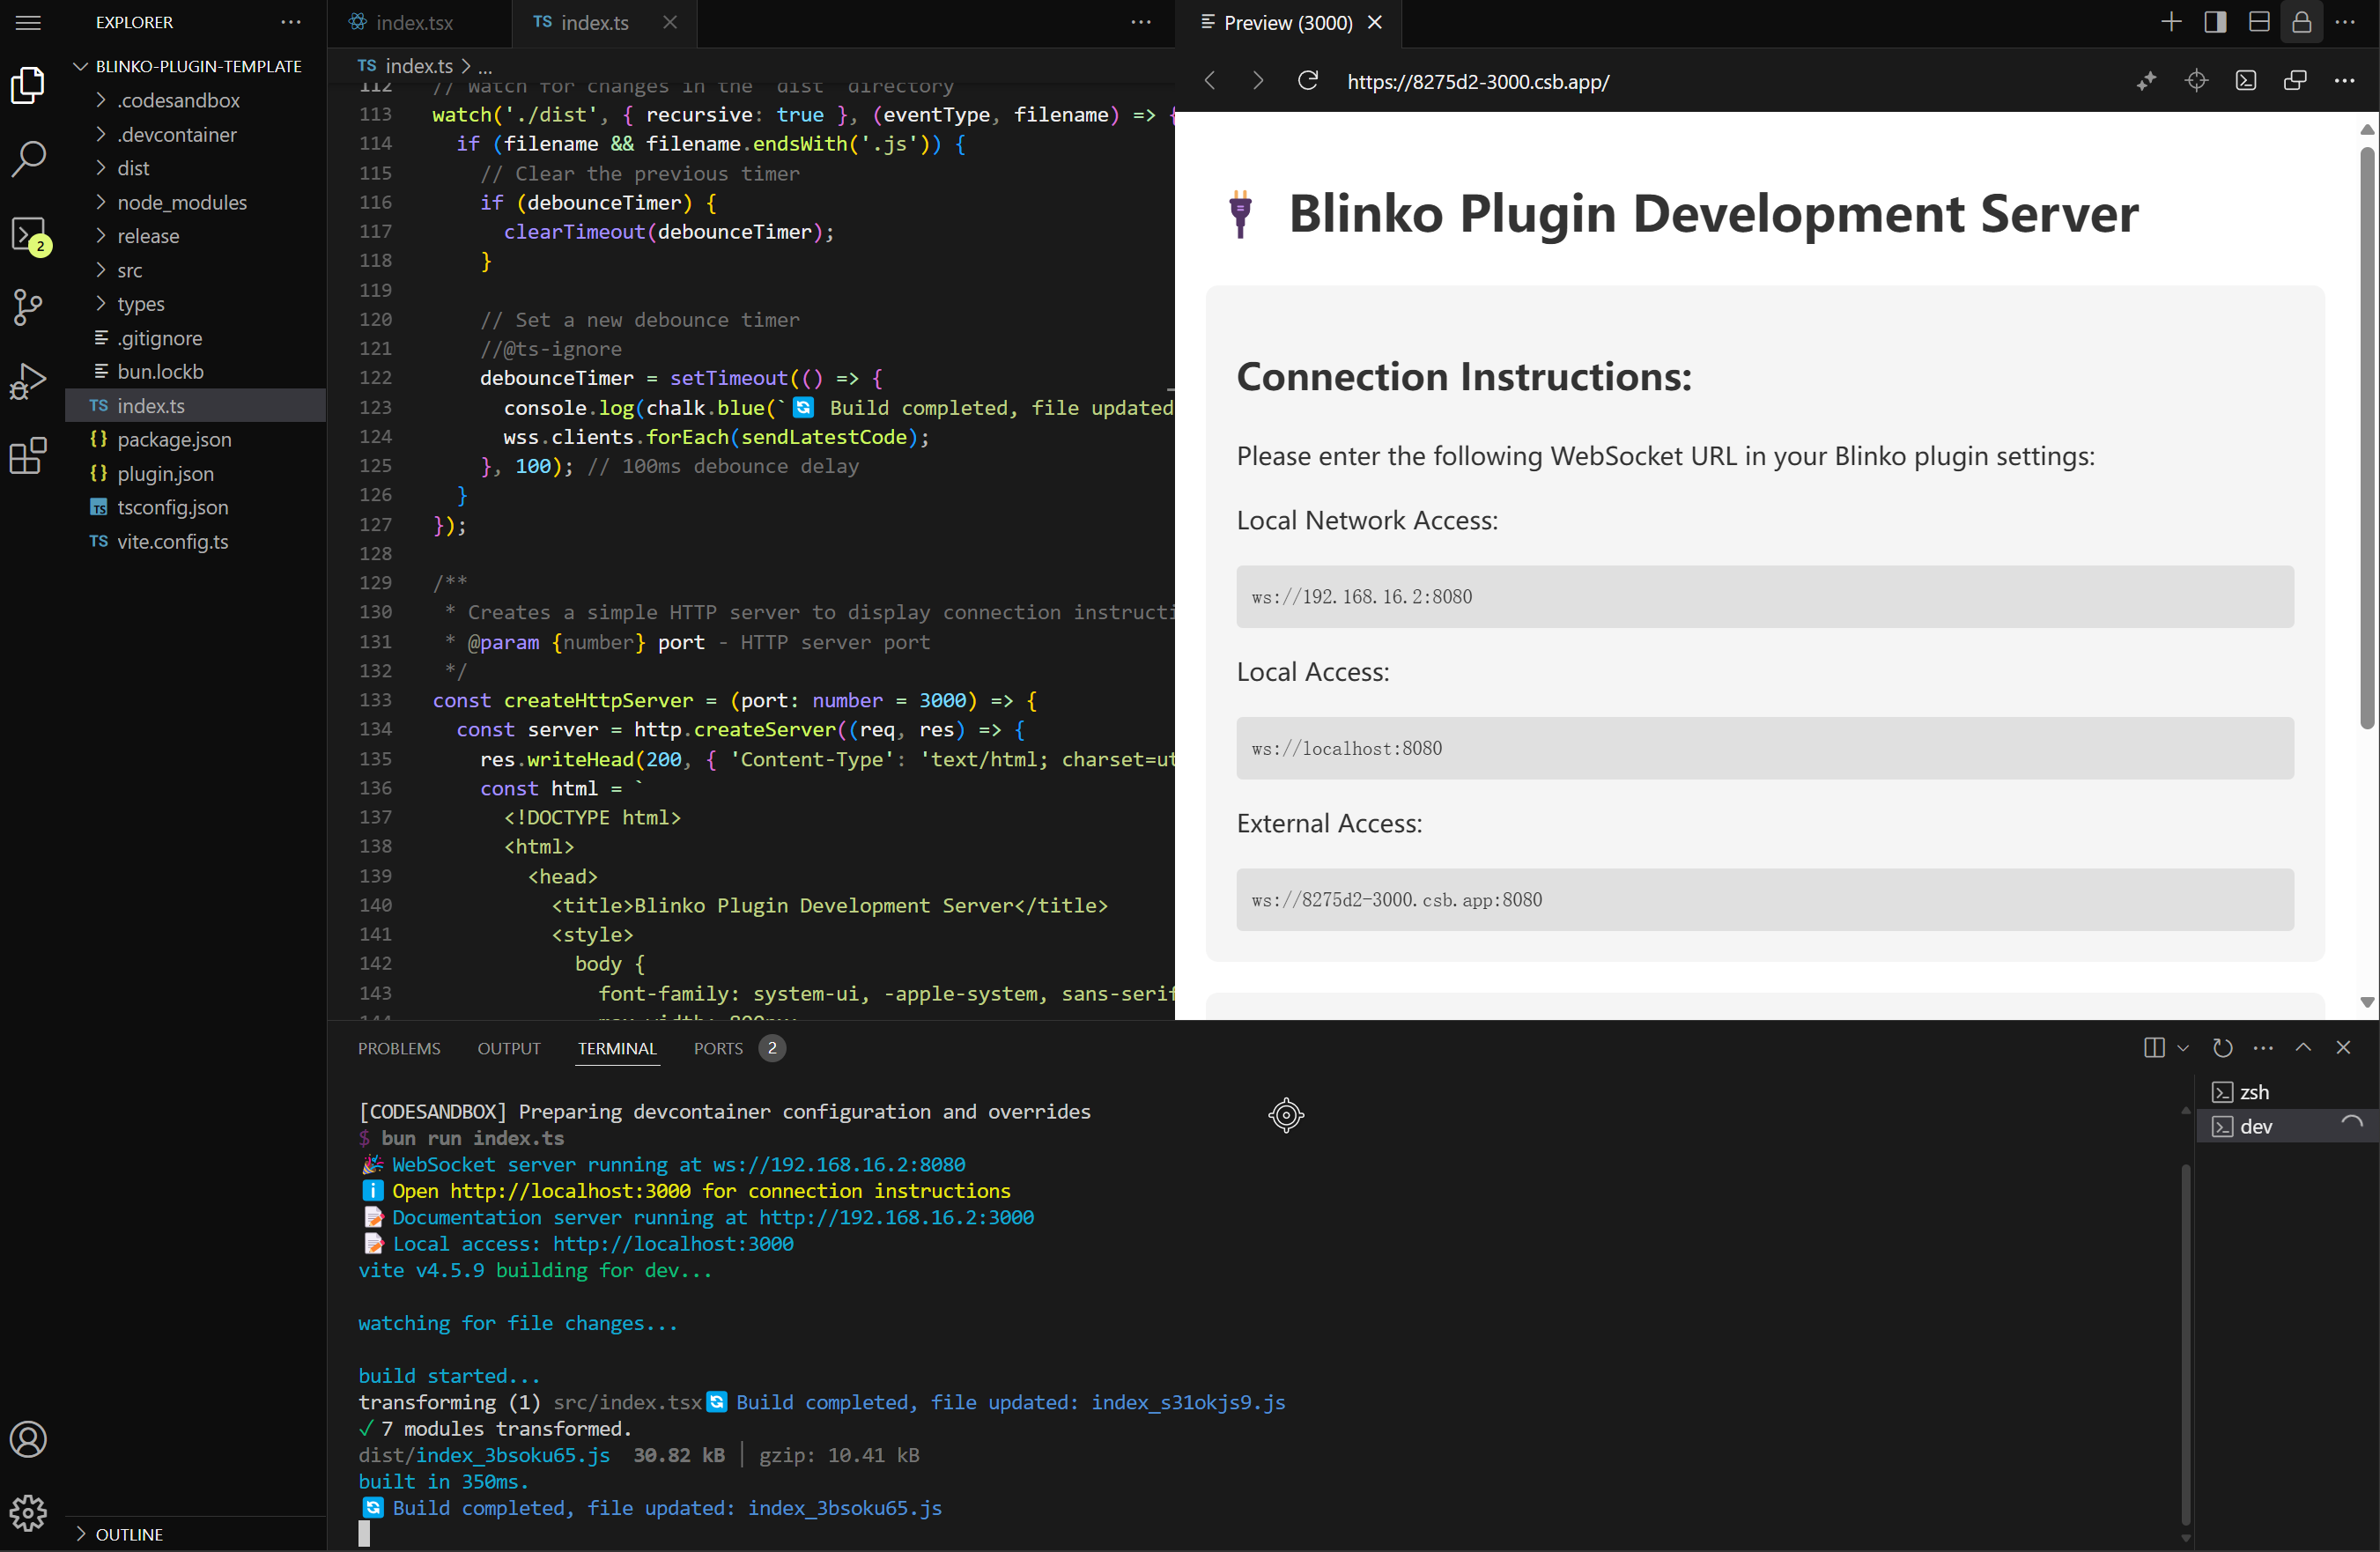 1. Visit our [Blinko Plugin Template on CodeSandbox](https://codesandbox.io/p/github/blinko-space/blinko-plugin-template/main)
2. Click "Fork" to create your own copy
3. The development server will start automatically
4. You'll see the connection instructions at `http://localhost:3000` showing:
* External Access: `ws://.csb.app:8080`
This is the fastest way to get started as it:
* Requires no local setup
* Provides instant development environment
* Offers built-in documentation server
* Enables easy sharing and collaboration
#### Option B: Use the Template Repository
1. Visit the [Blinko Plugin Template](https://github.com/blinko-space/blinko-plugin-template)
2. Click the "Use this template" button
3. Follow the GitHub prompts to create your repository
#### Option C: Clone the Template Repository
```bash theme={null}
git clone https://github.com/blinko-space/blinko-plugin-template.git my-blinko-plugin
cd my-blinko-plugin
```
### 2. Install Dependencies
Once you have your project set up, install the dependencies:
```bash theme={null}
bun install
```
### 3. Start Development Server
Start the development server to begin working on your plugin:
```bash theme={null}
bun dev
```
This will start a local development server, typically at `ws://localhost:8080`.
## Project Structure
The template provides a basic structure for your plugin:
```
my-blinko-plugin/
├── dist/ # Build output directory
├── release/ # Release build output
│ └── index.js # Compiled plugin code
├── src/ # Source code directory
│ ├── locales/ # Internationalization files
│ ├── app.tsx # Main React component
│ ├── index.tsx # Plugin entry point
│ └── setting.tsx # Plugin settings component
├── index.ts # Development entry point
├── plugin.json # Plugin metadata
└── vite.config.ts # Vite build configuration
```
### Key Files Explained
#### plugin.json
This file contains your plugin's metadata:
```json theme={null}
{
"name": "blinko-plugin-demo",
"author": "blinko-offical",
"url": "https://github.com/blinko-space/blinko-plugin-template",
"version": "0.0.4",
"minAppVersion": "0.0.0",
"displayName": {
"default": "Blinko plugin demo",
"zh": "Blinko插件示例"
},
"description": {
"default": "This is a blinko plugin demo, you can use it as a template to create your own plugin.",
"zh": "这是一个blinko插件示例,你可以使用它作为模板来创建自己的插件。"
},
"readme": {
"default": "README.md",
"zh": "README_zh.md"
}
}
```
Key fields explained:
* `name`: Unique identifier for your plugin (required)
* `author`: Plugin author's name or organization (required)
* `url`: Repository or homepage URL (required)
* `version`: Plugin version following semver (required)
* `minAppVersion`: Minimum Blinko app version required
* `displayName`: Localized plugin names
* `default`: Default display name (English)
* `zh`: Chinese display name (optional)
* `description`: Localized plugin descriptions
* `default`: Default description (English)
* `zh`: Chinese description (optional)
* `readme`: Localized documentation files
* `default`: Default README file path
* `zh`: Chinese README file path (optional)
When you run `bun dev`, the development server:
1. Starts a WebSocket server for communication
2. Watches the `dist` directory for changes
3. Automatically rebuilds when source files change
4. Sends the updated code to connected Blinko clients
You can access your development server at:
* Local: `ws://localhost:8080`
* Network: `ws://:8080`
### External Access with Ngrok
If Blinko is not deployed in your local network, you'll need to use ngrok to make your plugin accessible from the internet:
1. Start your development server first:
```bash theme={null}
bun dev
```
2. In a new terminal, run the ngrok command:
```bash theme={null}
bun ngrok
```
This will create a secure tunnel to your local development server and output something like:
```bash theme={null}
✨ Tunnel established
🌍 Forwarding: wss://xxxx-xx-xx-xxx-xx.ngrok.io -> ws://localhost:8080
```
Now you can use the ngrok URL (e.g., `wss://xxxx-xx-xx-xxx-xx.ngrok.io`) in Blinko to connect to your plugin.
The development server provides real-time feedback:
```bash theme={null}
🎉 Development server running at ws://192.168.1.100:8080
🔌 New Blinko client connected
📦 Build code size: 1234 bytes, Filename: index_abc123.js
🔄 Build completed, file updated: index.js
```
## Next Steps
### Connect Your Plugin to Blinko
Once your development server is running, follow these steps to add your plugin to Blinko:
1. Open Blinko and go to Settings
2. Click on "Plugin Setting"
3. Switch to the "Local Development" tab
4. Click the "Add Local Plugin" button
5. Enter your WebSocket URL:
* Local: `ws://localhost:8080`
* Network: `ws://:8080`
* Ngrok: `wss://xxxx-xx-xx-xxx-xx.ngrok.io` (if using ngrok)
6. Click "Connect" to start using your plugin
1. Visit our [Blinko Plugin Template on CodeSandbox](https://codesandbox.io/p/github/blinko-space/blinko-plugin-template/main)
2. Click "Fork" to create your own copy
3. The development server will start automatically
4. You'll see the connection instructions at `http://localhost:3000` showing:
* External Access: `ws://.csb.app:8080`
This is the fastest way to get started as it:
* Requires no local setup
* Provides instant development environment
* Offers built-in documentation server
* Enables easy sharing and collaboration
#### Option B: Use the Template Repository
1. Visit the [Blinko Plugin Template](https://github.com/blinko-space/blinko-plugin-template)
2. Click the "Use this template" button
3. Follow the GitHub prompts to create your repository
#### Option C: Clone the Template Repository
```bash theme={null}
git clone https://github.com/blinko-space/blinko-plugin-template.git my-blinko-plugin
cd my-blinko-plugin
```
### 2. Install Dependencies
Once you have your project set up, install the dependencies:
```bash theme={null}
bun install
```
### 3. Start Development Server
Start the development server to begin working on your plugin:
```bash theme={null}
bun dev
```
This will start a local development server, typically at `ws://localhost:8080`.
## Project Structure
The template provides a basic structure for your plugin:
```
my-blinko-plugin/
├── dist/ # Build output directory
├── release/ # Release build output
│ └── index.js # Compiled plugin code
├── src/ # Source code directory
│ ├── locales/ # Internationalization files
│ ├── app.tsx # Main React component
│ ├── index.tsx # Plugin entry point
│ └── setting.tsx # Plugin settings component
├── index.ts # Development entry point
├── plugin.json # Plugin metadata
└── vite.config.ts # Vite build configuration
```
### Key Files Explained
#### plugin.json
This file contains your plugin's metadata:
```json theme={null}
{
"name": "blinko-plugin-demo",
"author": "blinko-offical",
"url": "https://github.com/blinko-space/blinko-plugin-template",
"version": "0.0.4",
"minAppVersion": "0.0.0",
"displayName": {
"default": "Blinko plugin demo",
"zh": "Blinko插件示例"
},
"description": {
"default": "This is a blinko plugin demo, you can use it as a template to create your own plugin.",
"zh": "这是一个blinko插件示例,你可以使用它作为模板来创建自己的插件。"
},
"readme": {
"default": "README.md",
"zh": "README_zh.md"
}
}
```
Key fields explained:
* `name`: Unique identifier for your plugin (required)
* `author`: Plugin author's name or organization (required)
* `url`: Repository or homepage URL (required)
* `version`: Plugin version following semver (required)
* `minAppVersion`: Minimum Blinko app version required
* `displayName`: Localized plugin names
* `default`: Default display name (English)
* `zh`: Chinese display name (optional)
* `description`: Localized plugin descriptions
* `default`: Default description (English)
* `zh`: Chinese description (optional)
* `readme`: Localized documentation files
* `default`: Default README file path
* `zh`: Chinese README file path (optional)
When you run `bun dev`, the development server:
1. Starts a WebSocket server for communication
2. Watches the `dist` directory for changes
3. Automatically rebuilds when source files change
4. Sends the updated code to connected Blinko clients
You can access your development server at:
* Local: `ws://localhost:8080`
* Network: `ws://:8080`
### External Access with Ngrok
If Blinko is not deployed in your local network, you'll need to use ngrok to make your plugin accessible from the internet:
1. Start your development server first:
```bash theme={null}
bun dev
```
2. In a new terminal, run the ngrok command:
```bash theme={null}
bun ngrok
```
This will create a secure tunnel to your local development server and output something like:
```bash theme={null}
✨ Tunnel established
🌍 Forwarding: wss://xxxx-xx-xx-xxx-xx.ngrok.io -> ws://localhost:8080
```
Now you can use the ngrok URL (e.g., `wss://xxxx-xx-xx-xxx-xx.ngrok.io`) in Blinko to connect to your plugin.
The development server provides real-time feedback:
```bash theme={null}
🎉 Development server running at ws://192.168.1.100:8080
🔌 New Blinko client connected
📦 Build code size: 1234 bytes, Filename: index_abc123.js
🔄 Build completed, file updated: index.js
```
## Next Steps
### Connect Your Plugin to Blinko
Once your development server is running, follow these steps to add your plugin to Blinko:
1. Open Blinko and go to Settings
2. Click on "Plugin Setting"
3. Switch to the "Local Development" tab
4. Click the "Add Local Plugin" button
5. Enter your WebSocket URL:
* Local: `ws://localhost:8080`
* Network: `ws://:8080`
* Ngrok: `wss://xxxx-xx-xx-xxx-xx.ngrok.io` (if using ngrok)
6. Click "Connect" to start using your plugin
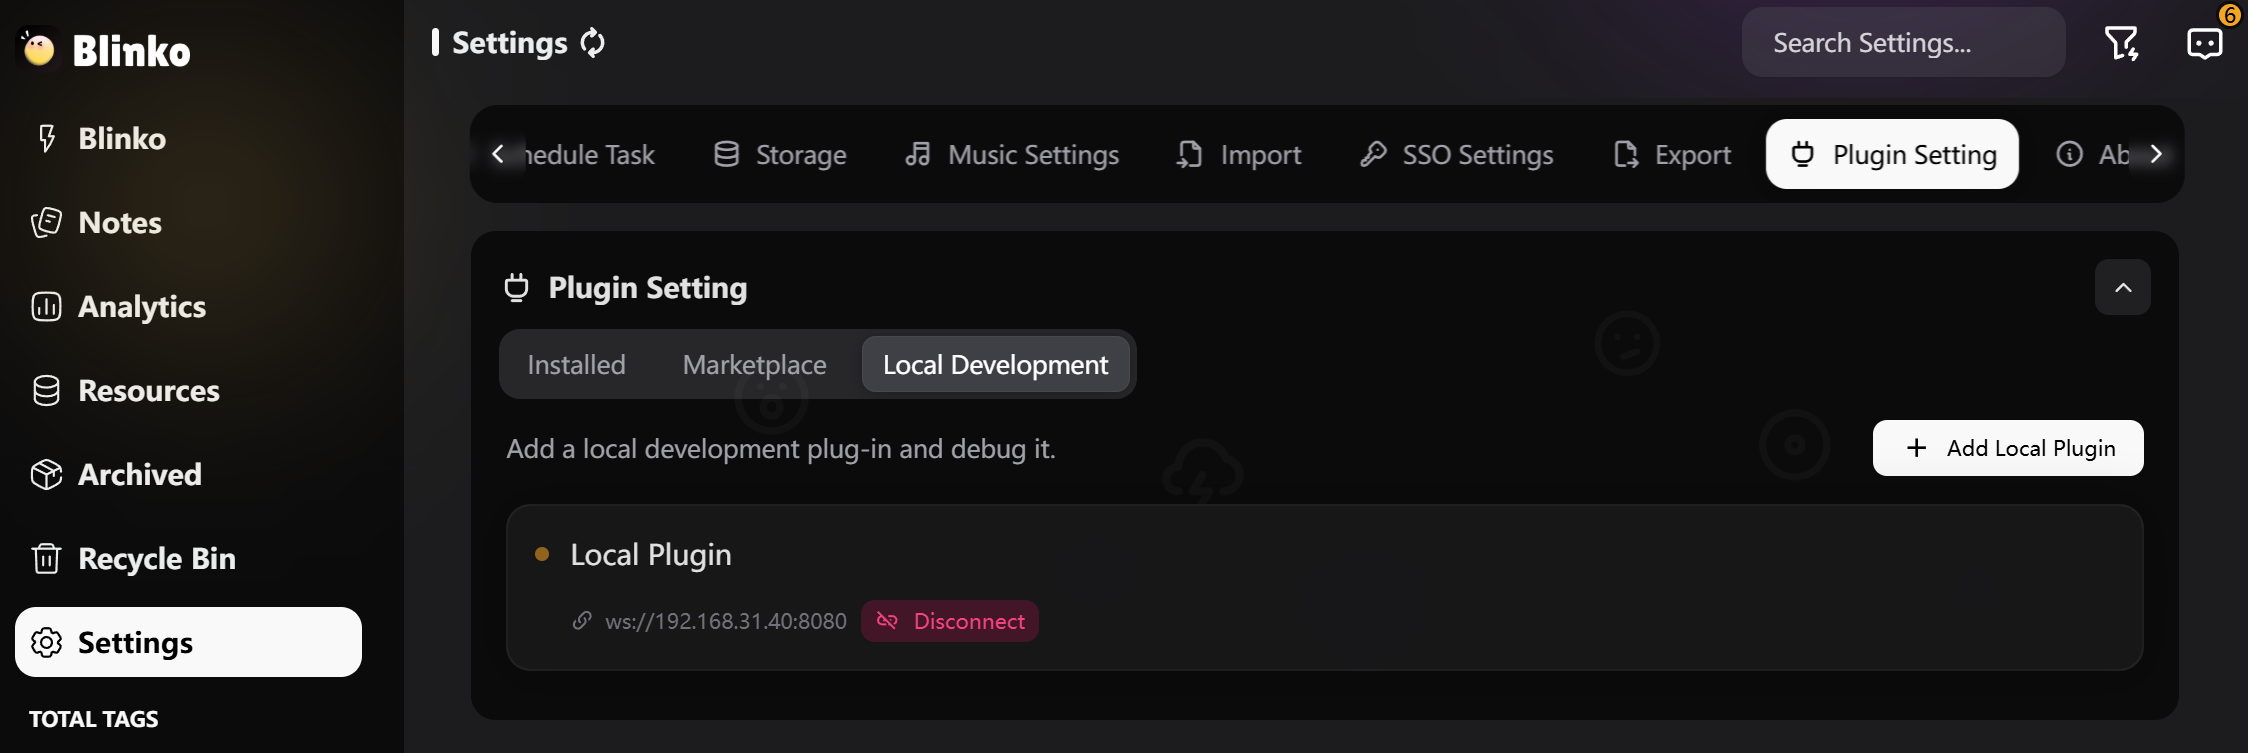 If the connection is successful, you'll see your plugin listed as "Local Plugin" with a green status indicator.
### Troubleshooting Connection Issues
If you can't connect to your plugin:
1. Make sure your development server is running (`bun dev`)
2. Check that the WebSocket URL is correct
3. If using a local network URL, ensure you're on the same network
4. For ngrok connections, make sure to use the `wss://` URL provided by ngrok
## Additional Resources
* Publish plugin to Blinko Plugin Marketplace [Publish plugin](/en/plugins/publish-plugin)
* Check out the [API Reference](/en/plugins/api-reference) to learn about available APIs
* Join our [community](/en/community/community) to get help and share your plugins
If the connection is successful, you'll see your plugin listed as "Local Plugin" with a green status indicator.
### Troubleshooting Connection Issues
If you can't connect to your plugin:
1. Make sure your development server is running (`bun dev`)
2. Check that the WebSocket URL is correct
3. If using a local network URL, ensure you're on the same network
4. For ngrok connections, make sure to use the `wss://` URL provided by ngrok
## Additional Resources
* Publish plugin to Blinko Plugin Marketplace [Publish plugin](/en/plugins/publish-plugin)
* Check out the [API Reference](/en/plugins/api-reference) to learn about available APIs
* Join our [community](/en/community/community) to get help and share your plugins