> ## Documentation Index
> Fetch the complete documentation index at: https://docs.blinko.space/llms.txt
> Use this file to discover all available pages before exploring further.
# 开始使用
> 欢迎来到Blinko插件开发!本指南将帮助您设置开发环境并创建您的第一个插件。
## 先决条件
在开始之前,请确保您已安装以下内容:
* [Node.js](https://nodejs.org/) (v18或更高)
* [Bun](https://bun.sh/) (最新版本)
* [Git](https://git-scm.com/)
## 设置您的开发环境
### 1. 创建新的插件项目
您有三种选项来开始您的插件项目:
#### 选项A:使用CodeSandbox(推荐快速开始)
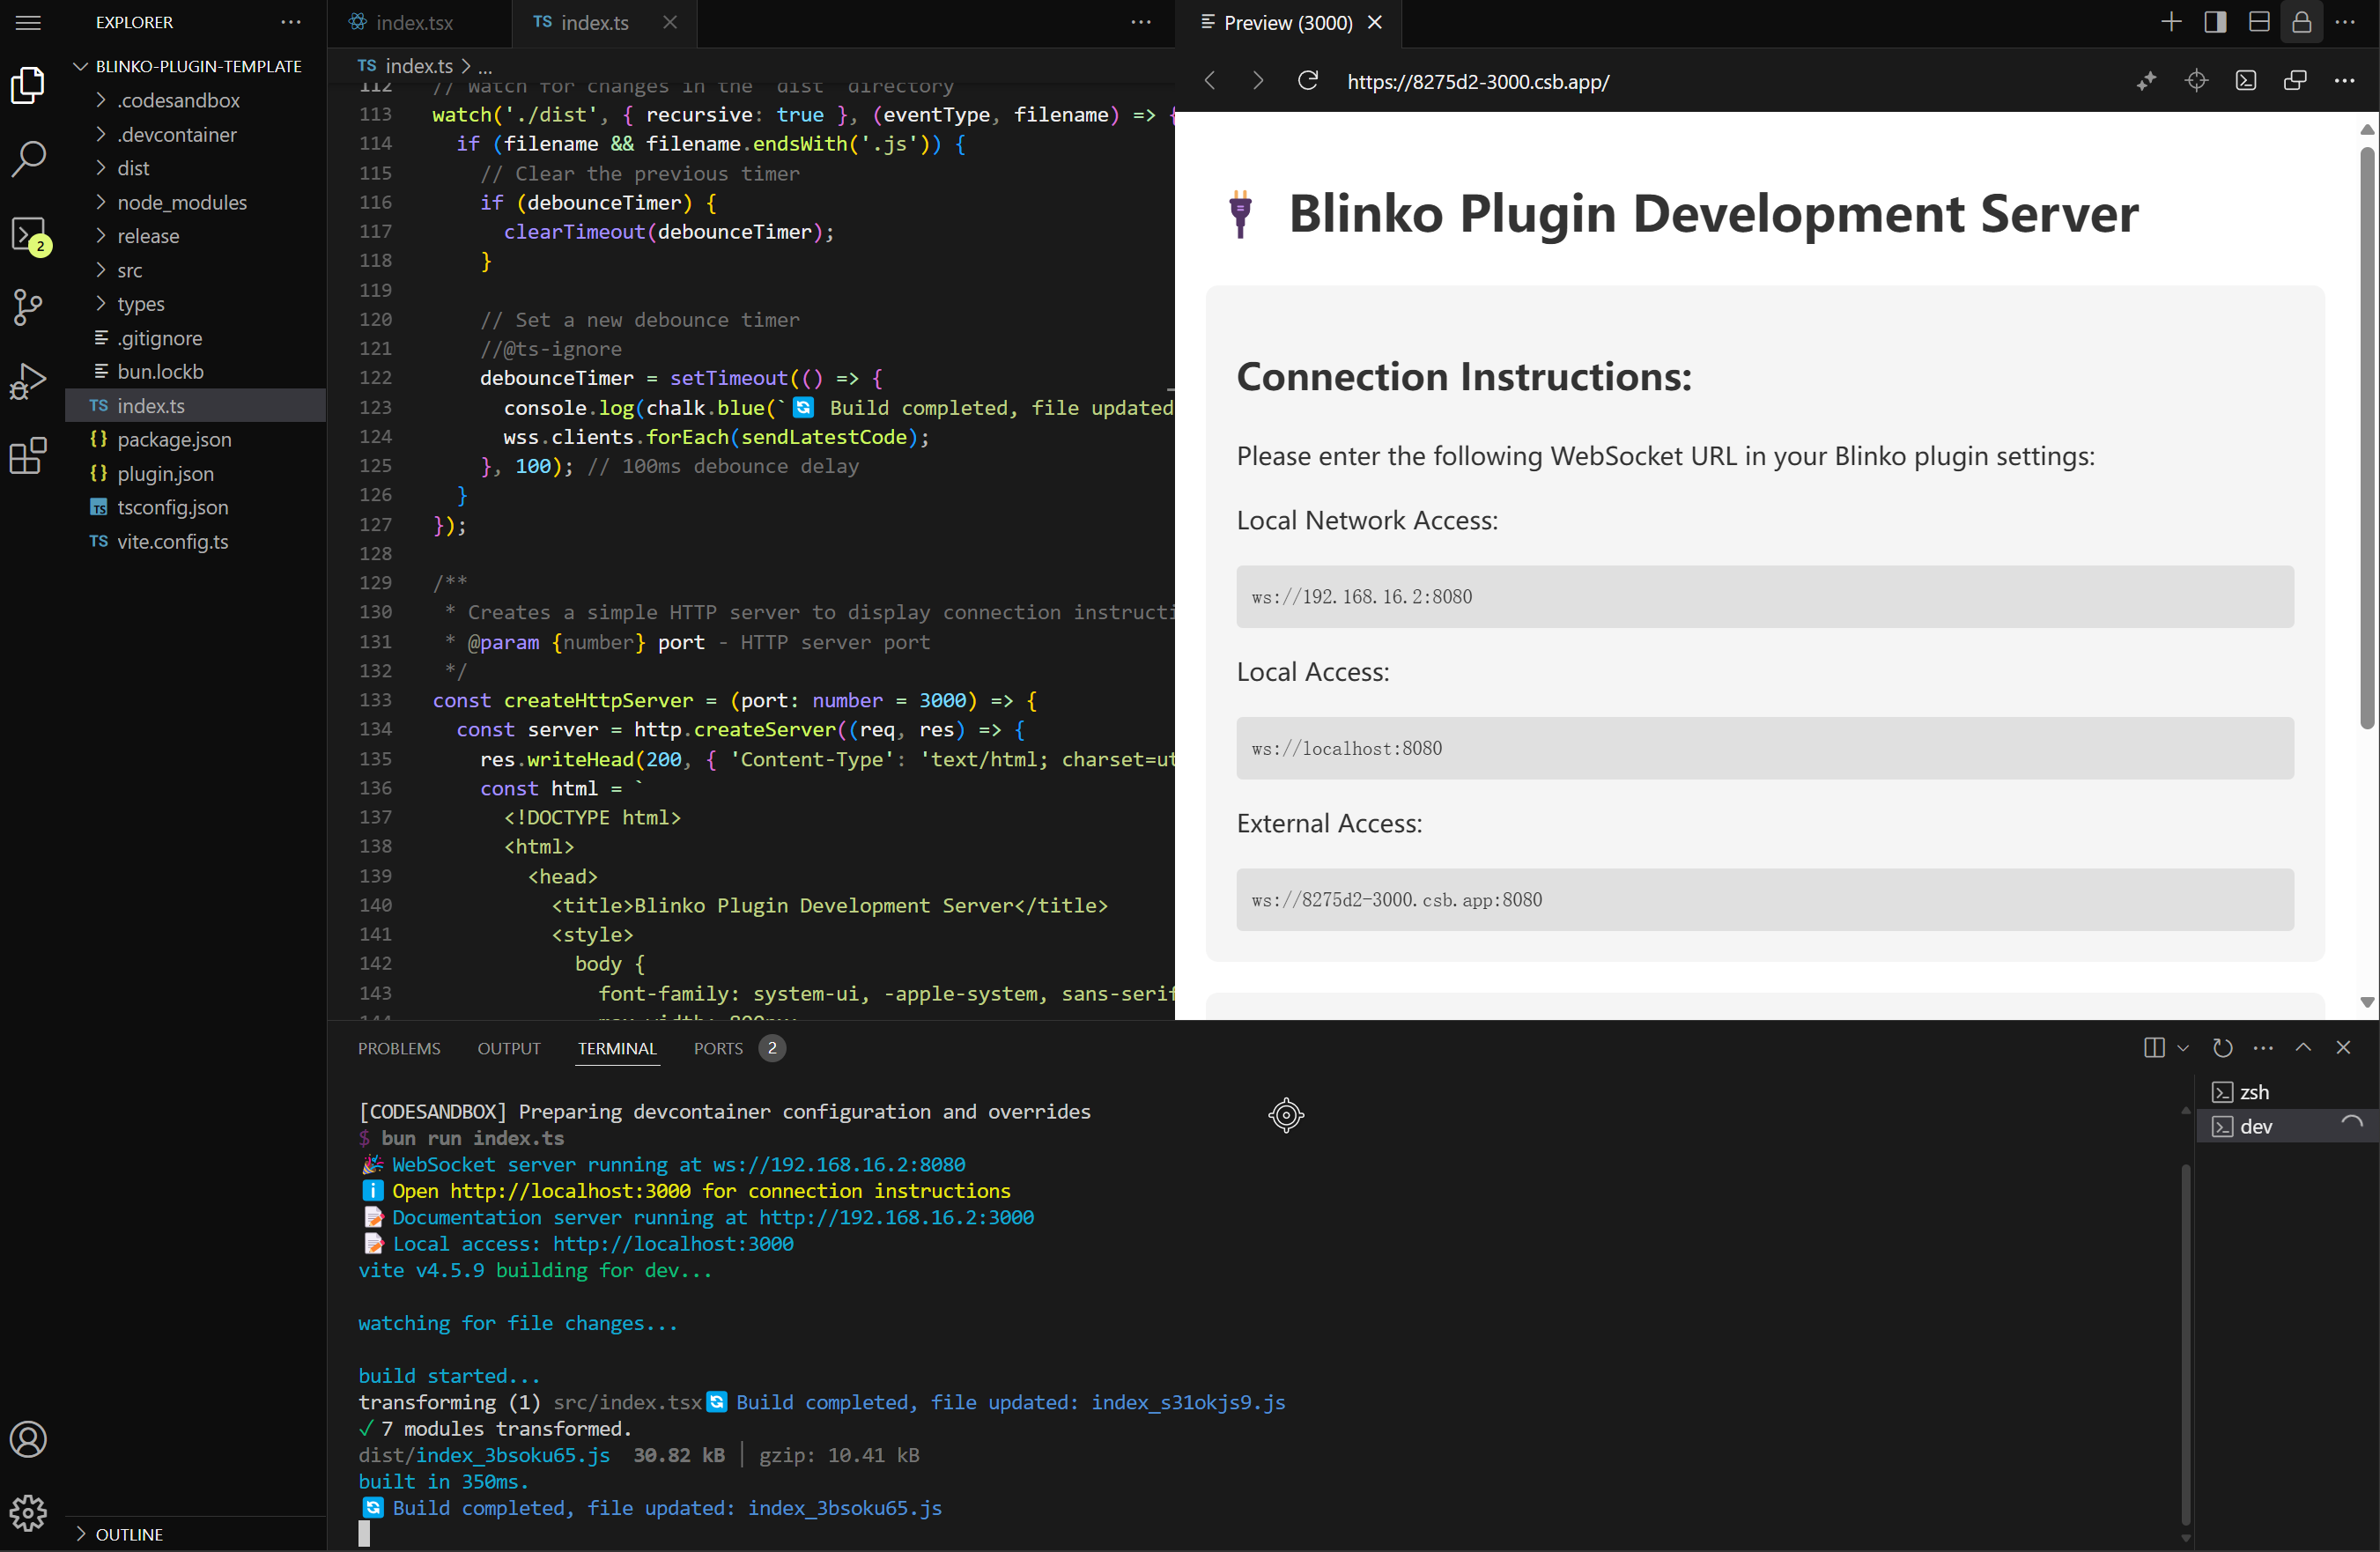 1. 访问我们的[Blinko插件模板在CodeSandbox](https://codesandbox.io/p/github/blinko-space/blinko-plugin-template/main)
2. 点击"Fork"创建您自己的副本
3. 开发服务器将自动启动
4. 您将在`http://localhost:3000`看到连接说明:
* 外部访问:`ws://.csb.app:8080`
这是最快的开始方式,因为它:
* 不需要本地设置
* 提供即时开发环境
* 提供内置文档服务器
* 支持轻松分享和协作
#### 选项B:使用模板仓库
1. 访问[Blinko插件模板](https://github.com/blinko-space/blinko-plugin-template)
2. 点击"Use this template"按钮
3. 按照GitHub提示创建您的仓库
#### 选项C:克隆模板仓库
```bash theme={null}
git clone https://github.com/blinko-space/blinko-plugin-template.git my-blinko-plugin
cd my-blinko-plugin
```
### 2. 安装依赖
一旦您设置好项目,安装依赖:
```bash theme={null}
bun install
```
### 3. 启动开发服务器
启动开发服务器以开始处理您的插件:
```bash theme={null}
bun dev
```
这将启动一个本地开发服务器,通常在`ws://localhost:8080`。
## 项目结构
模板为您的插件提供了一个基本结构:
```
my-blinko-plugin/
├── dist/ # 构建输出目录
├── release/ # 发布构建输出
│ └── index.js # 编译后的插件代码
├── src/ # 源代码目录
│ ├── locales/ # 国际化文件
│ ├── app.tsx # 主React组件
│ ├── index.tsx # 插件入口点
│ └── setting.tsx # 插件设置组件
├── index.ts # 开发入口点
├── plugin.json # 插件元数据
└── vite.config.ts # Vite构建配置
```
### 关键文件说明
#### plugin.json
此文件包含您插件的元数据:
```json theme={null}
{
"name": "blinko-plugin-demo",
"author": "blinko-offical",
"url": "https://github.com/blinko-space/blinko-plugin-template",
"version": "0.0.4",
"minAppVersion": "0.0.0",
"displayName": {
"default": "Blinko plugin demo",
"zh": "Blinko插件示例"
},
"description": {
"default": "This is a blinko plugin demo, you can use it as a template to create your own plugin.",
"zh": "这是一个blinko插件示例,你可以使用它作为模板来创建自己的插件。"
},
"readme": {
"default": "README.md",
"zh": "README_zh.md"
}
}
```
关键字段说明:
* `name`:插件的唯一标识符(必需)
* `author`:插件作者的名称或组织(必需)
* `url`:仓库或主页URL(必需)
* `version`:遵循semver的插件版本(必需)
* `minAppVersion`:需要的最低Blinko应用版本
* `displayName`:本地化的插件名称
* `default`:默认显示名称(英文)
* `zh`:中文显示名称(可选)
* `description`:本地化的插件描述
* `default`:默认描述(英文)
* `zh`:中文描述(可选)
* `readme`:本地化的文档文件
* `default`:默认README文件路径
* `zh`:中文README文件路径(可选)
当您运行`bun dev`时,开发服务器:
1. 启动一个WebSocket服务器用于通信
2. 监视`dist`目录的变化
3. 当源文件更改时自动重建
4. 将更新的代码发送到已连接的Blinko客户端
您可以在以下地址访问您的开发服务器:
* 本地:`ws://localhost:8080`
* 网络:`ws://:8080`
### 使用Ngrok进行外部访问
如果Blinko未部署在您的本地网络中,您需要使用ngrok使您的插件可以从互联网访问:
1. 首先启动您的开发服务器:
```bash theme={null}
bun dev
```
2. 在新终端中,运行ngrok命令:
```bash theme={null}
bun ngrok
```
这将创建一个到您本地开发服务器的安全隧道,并输出类似内容:
```bash theme={null}
✨ Tunnel established
🌍 Forwarding: wss://xxxx-xx-xx-xxx-xx.ngrok.io -> ws://localhost:8080
```
现在您可以在Blinko中使用ngrok URL(例如,`wss://xxxx-xx-xx-xxx-xx.ngrok.io`)连接到您的插件。
开发服务器提供实时反馈:
```bash theme={null}
🎉 Development server running at ws://192.168.1.100:8080
🔌 New Blinko client connected
📦 Build code size: 1234 bytes, Filename: index_abc123.js
🔄 Build completed, file updated: index.js
```
## 后续步骤
### 将您的插件连接到Blinko
一旦您的开发服务器运行后,按照以下步骤将您的插件添加到Blinko:
1. 打开Blinko并进入设置
2. 点击"插件设置"
3. 切换到"本地开发"选项卡
4. 点击"添加本地插件"按钮
5. 输入您的WebSocket URL:
* 本地:`ws://localhost:8080`
* 网络:`ws://:8080`
* Ngrok:`wss://xxxx-xx-xx-xxx-xx.ngrok.io`(如果使用ngrok)
6. 点击"连接"开始使用您的插件
1. 访问我们的[Blinko插件模板在CodeSandbox](https://codesandbox.io/p/github/blinko-space/blinko-plugin-template/main)
2. 点击"Fork"创建您自己的副本
3. 开发服务器将自动启动
4. 您将在`http://localhost:3000`看到连接说明:
* 外部访问:`ws://.csb.app:8080`
这是最快的开始方式,因为它:
* 不需要本地设置
* 提供即时开发环境
* 提供内置文档服务器
* 支持轻松分享和协作
#### 选项B:使用模板仓库
1. 访问[Blinko插件模板](https://github.com/blinko-space/blinko-plugin-template)
2. 点击"Use this template"按钮
3. 按照GitHub提示创建您的仓库
#### 选项C:克隆模板仓库
```bash theme={null}
git clone https://github.com/blinko-space/blinko-plugin-template.git my-blinko-plugin
cd my-blinko-plugin
```
### 2. 安装依赖
一旦您设置好项目,安装依赖:
```bash theme={null}
bun install
```
### 3. 启动开发服务器
启动开发服务器以开始处理您的插件:
```bash theme={null}
bun dev
```
这将启动一个本地开发服务器,通常在`ws://localhost:8080`。
## 项目结构
模板为您的插件提供了一个基本结构:
```
my-blinko-plugin/
├── dist/ # 构建输出目录
├── release/ # 发布构建输出
│ └── index.js # 编译后的插件代码
├── src/ # 源代码目录
│ ├── locales/ # 国际化文件
│ ├── app.tsx # 主React组件
│ ├── index.tsx # 插件入口点
│ └── setting.tsx # 插件设置组件
├── index.ts # 开发入口点
├── plugin.json # 插件元数据
└── vite.config.ts # Vite构建配置
```
### 关键文件说明
#### plugin.json
此文件包含您插件的元数据:
```json theme={null}
{
"name": "blinko-plugin-demo",
"author": "blinko-offical",
"url": "https://github.com/blinko-space/blinko-plugin-template",
"version": "0.0.4",
"minAppVersion": "0.0.0",
"displayName": {
"default": "Blinko plugin demo",
"zh": "Blinko插件示例"
},
"description": {
"default": "This is a blinko plugin demo, you can use it as a template to create your own plugin.",
"zh": "这是一个blinko插件示例,你可以使用它作为模板来创建自己的插件。"
},
"readme": {
"default": "README.md",
"zh": "README_zh.md"
}
}
```
关键字段说明:
* `name`:插件的唯一标识符(必需)
* `author`:插件作者的名称或组织(必需)
* `url`:仓库或主页URL(必需)
* `version`:遵循semver的插件版本(必需)
* `minAppVersion`:需要的最低Blinko应用版本
* `displayName`:本地化的插件名称
* `default`:默认显示名称(英文)
* `zh`:中文显示名称(可选)
* `description`:本地化的插件描述
* `default`:默认描述(英文)
* `zh`:中文描述(可选)
* `readme`:本地化的文档文件
* `default`:默认README文件路径
* `zh`:中文README文件路径(可选)
当您运行`bun dev`时,开发服务器:
1. 启动一个WebSocket服务器用于通信
2. 监视`dist`目录的变化
3. 当源文件更改时自动重建
4. 将更新的代码发送到已连接的Blinko客户端
您可以在以下地址访问您的开发服务器:
* 本地:`ws://localhost:8080`
* 网络:`ws://:8080`
### 使用Ngrok进行外部访问
如果Blinko未部署在您的本地网络中,您需要使用ngrok使您的插件可以从互联网访问:
1. 首先启动您的开发服务器:
```bash theme={null}
bun dev
```
2. 在新终端中,运行ngrok命令:
```bash theme={null}
bun ngrok
```
这将创建一个到您本地开发服务器的安全隧道,并输出类似内容:
```bash theme={null}
✨ Tunnel established
🌍 Forwarding: wss://xxxx-xx-xx-xxx-xx.ngrok.io -> ws://localhost:8080
```
现在您可以在Blinko中使用ngrok URL(例如,`wss://xxxx-xx-xx-xxx-xx.ngrok.io`)连接到您的插件。
开发服务器提供实时反馈:
```bash theme={null}
🎉 Development server running at ws://192.168.1.100:8080
🔌 New Blinko client connected
📦 Build code size: 1234 bytes, Filename: index_abc123.js
🔄 Build completed, file updated: index.js
```
## 后续步骤
### 将您的插件连接到Blinko
一旦您的开发服务器运行后,按照以下步骤将您的插件添加到Blinko:
1. 打开Blinko并进入设置
2. 点击"插件设置"
3. 切换到"本地开发"选项卡
4. 点击"添加本地插件"按钮
5. 输入您的WebSocket URL:
* 本地:`ws://localhost:8080`
* 网络:`ws://:8080`
* Ngrok:`wss://xxxx-xx-xx-xxx-xx.ngrok.io`(如果使用ngrok)
6. 点击"连接"开始使用您的插件
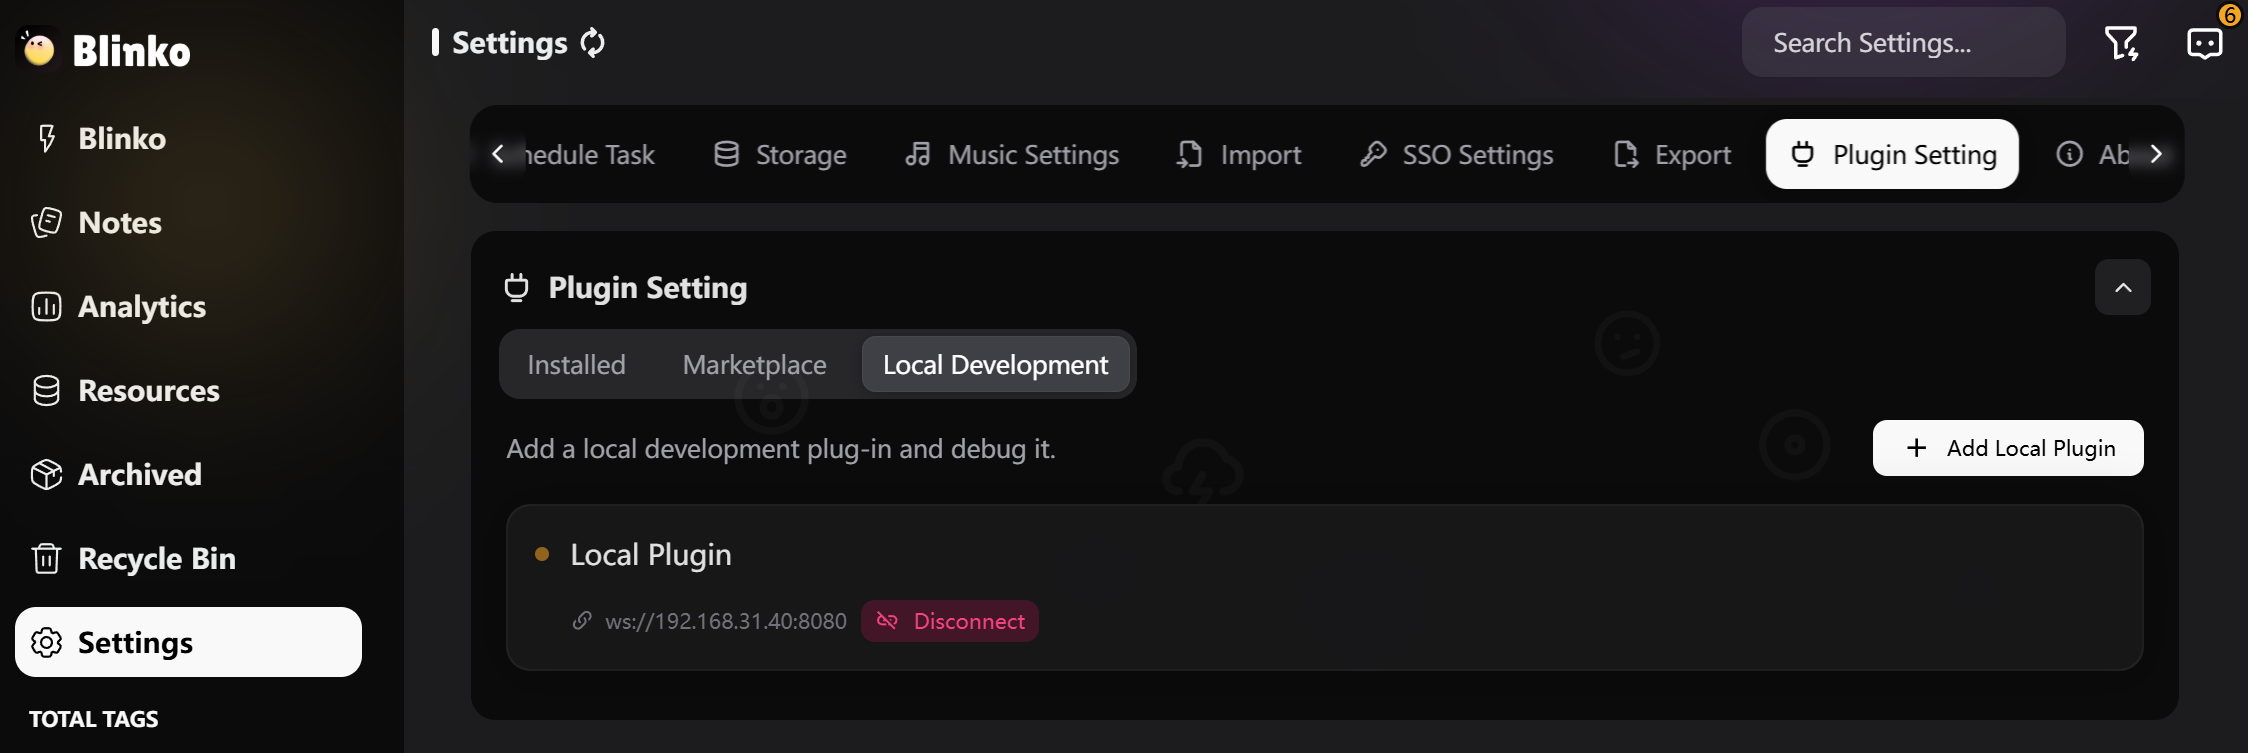 如果连接成功,您将看到您的插件列为"本地插件",旁边有一个绿色状态指示器。
### 连接问题故障排除
如果您无法连接到您的插件:
1. 确保您的开发服务器正在运行(`bun dev`)
2. 检查WebSocket URL是否正确
3. 如果使用本地网络URL,确保您在同一网络上
4. 对于ngrok连接,确保使用ngrok提供的`wss://` URL
## 其他资源
* 发布插件到Blinko插件市场[发布插件](/plugins/publish-plugin)
* 查看[API参考](/plugins/api-reference)了解可用的API
* 加入我们的[社区](/zh/community/community)获取帮助并分享您的插件
如果连接成功,您将看到您的插件列为"本地插件",旁边有一个绿色状态指示器。
### 连接问题故障排除
如果您无法连接到您的插件:
1. 确保您的开发服务器正在运行(`bun dev`)
2. 检查WebSocket URL是否正确
3. 如果使用本地网络URL,确保您在同一网络上
4. 对于ngrok连接,确保使用ngrok提供的`wss://` URL
## 其他资源
* 发布插件到Blinko插件市场[发布插件](/plugins/publish-plugin)
* 查看[API参考](/plugins/api-reference)了解可用的API
* 加入我们的[社区](/zh/community/community)获取帮助并分享您的插件